Tag Archives: LoRa

SX1276-LoRa one article is enough

This article will list all of the resources for Lora’s development and application. We will keep updating when we find any valuable resources. Here are the categories: Products, Datasheet, Libraries, Applications, accessories.

Products

Datasheet

SX1276-7-8-9 Datasheet

Development Support Documents

Introducing LoRa™ !

Libraries

A LoRaWan Gateway in LUA

Arduino library for LoRa modules based on SX127x/RFM9x chips

Arduino Core for STM32L0

Arduino LoRa E32 Series device library complete and tested with Arduino, esp8266 and esp32.

LoRa node on nRF52

A complete model of a low-cost sensor node device using solar energy and an sx1276 transmitter for a LoRa Wireless Sensor Network.

The Things Network Gateway based on Raspberry Pi and resin.io

A platform-agnostic driver for Semtech SX1276/77/78/79 based boards. It supports any device that implements the embedded-hal traits. Devices are connected over SPI and require an extra GPIO pin for RESET.

wMbus receiver based on STM32L476 Nucleo and Hope RF95.

AzureIoT Hub Windows 10 IotCore Field Gateway for LoRa capable device.

Port for PSoC devices of the IBM LMiC for SEMTECH LoRa radios .

Библиотека управления приемопередатчиком sx1276/7/8/9

C# Semtech SX127X/RFM9X LoRa library for Windows 10 IoT Core powered devices 

Arduino library for LoRa modules based on SX127x/RFM9x chips modified for Linux and possible Orange/Raspberry PI

A library for sending data using SX1276 LoRa radio using PIC as MCU.

P8X32A/Propeller driver object for the Semtech SX1276 LoRa transceiver chip

ATTiny1614 + SX1276 + BME280

LoRa RFM95/SX1276 libraries for PIC 8 bit microcontrollers

Project-Applications

  1. SLoRa – Wireless weather station for agriculture Project by DorijanLow power, Long-range wireless weather sensor system to detect potential frosting and alert the farmer to take action.
  2. ESP32 – LoRa – OLED Module Project by data Get the most out of your (heltec/ttgo/aliexpress) ESP32 LoRa OLED development board.
  3. Spy Thing Project by Ville TiukuvaaraA tracking device with GPS, a digital microphone, LoRa transceiver, and an STM32 microcontroller.
  4. Using Ultrasonic sensor with Lora Ra-02 ( or SX1276) use a wireless ultrasonic sensor to monitor the water level in the well/tanks at our cottage. 

DWM-LJ1295 LoRa transceiver RF module Datasheet

DWM-LJ1295 is LoRa transceiver RF module which build by Sx1276 chipset for more details about the Sx1276 you can visit the link: sx1276datasheet .

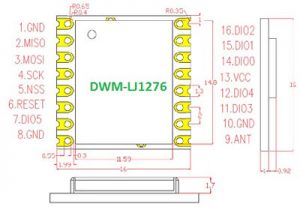
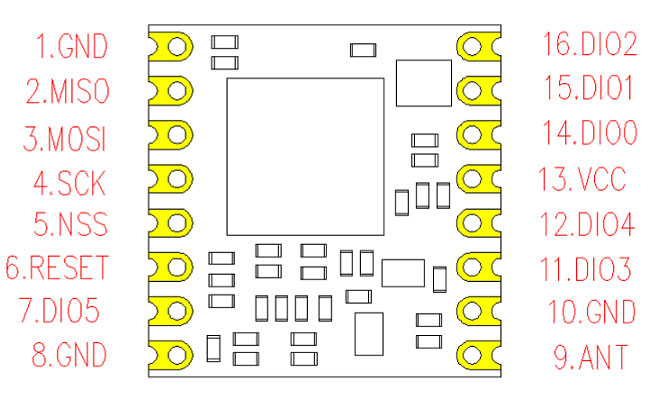
1.DWM-LJ1295 PIN Diagram

DWM-JL1295-datasheet-pin-dagram

DWM-JL1295-datasheet-pin-dagram

2.Pin Description

PIN No.  Name I/O/P Description
 1  GND  I  Ground
 2   MISO  O  SPI Data output
 3  MOSI  I  SPI Data input
 4  SCK  I  SPI Clock input
 5  NSS  I  SPI Chip select input
 6  RESET  I  Reset trigger input
 7  DIO5  I/O  Digital I/O, software configured
 8  GND  I  Ground
 9  ANT  O  RF Output
 10  GND  I  Ground
 11  DIO3  I/O  Digital I/O, software configured
 12  DIO4  I/O  Digital I/O, software configured
 13  VCC  I  Supply voltage for moudule
 14  DIO0  I/O  Digital I/O, software configured
 15  DIO1  I/O  Digital I/O, software configured
 16  DIO2  I/O  Digital I/O, software configured

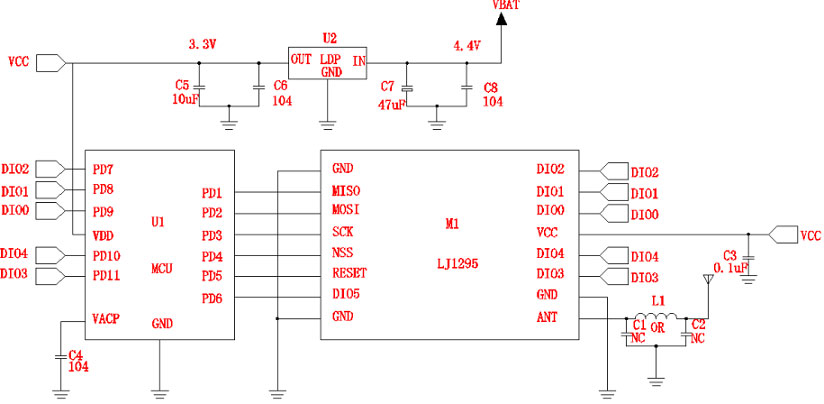
3.Reference Design

DWM-JL1295-datasheet-reference-design

DWM-JL1295-datasheet-reference-design

3.1 BOM of Typical Application

Designator Description Manufacturer
 M1  Module LJ1295 16*16*1.8mm RoHS  Dwmzone
 U1  IC 8 BIT MCU STM8S003F3 SSOP20 RoHS  MICROICHIP
 U2  IC LDO XC6206P33PR 3.3V SOT-23 RoHS  TOREX
 L1  Thick film resistor0R 5% 1/16W 0402 RoHS  ROHM
 C1  NC
 C2  NC
 C3  CER 0.1uF/25V 20% X7R 0402 RoHS  MURATA
 C4  CER 0.1uF/25V 20% X7R 0402 RoHS  MURATA
 C5  CAP CER 10uF/16V 20% X5R 0402 RoHS  MURATA
 C6  CER 0.1uF/25V 20% X7R 0402 RoHS  MURATA
 C7  CAP CER 47uF/16V 20% X5R 1206 RoHS  MURATA
 C8  CER 0.1uF/25V 20% X7R 0402 RoHS  MURATA

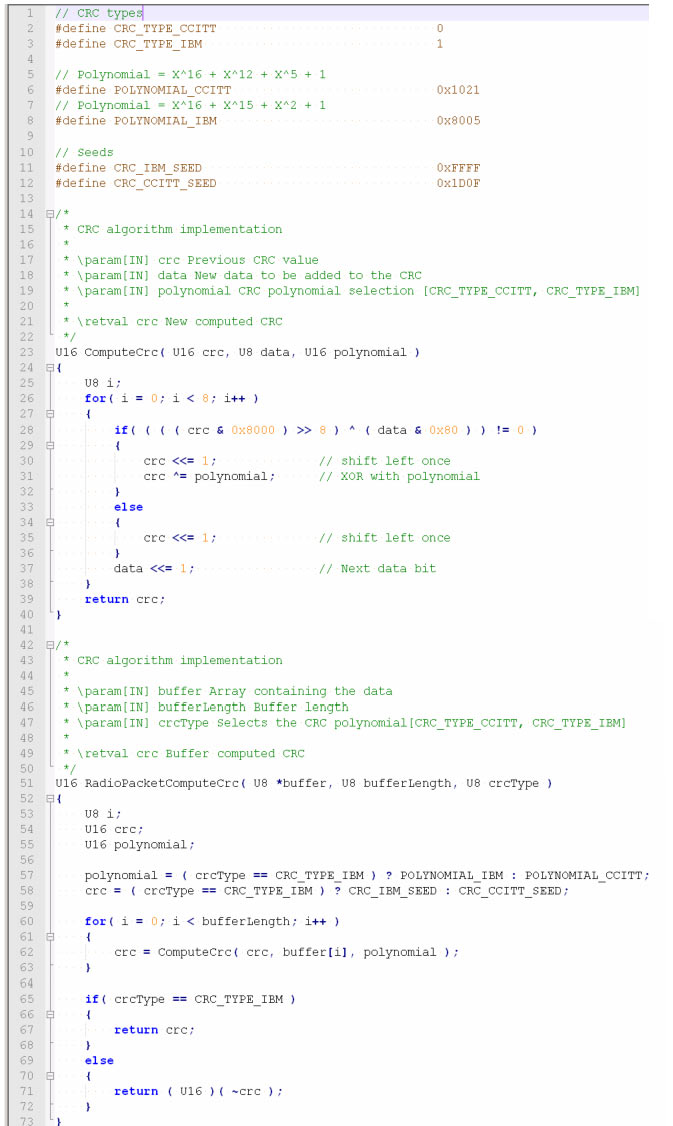
4.Example CRC Calculation

The following routine(s) may be implemented to mimic the CRC calculation of the DWM-LJ1295.

DWM-JL1295-datasheet-Example-CRC-Calculation

DWM-JL1295-datasheet-Example-CRC-Calculation

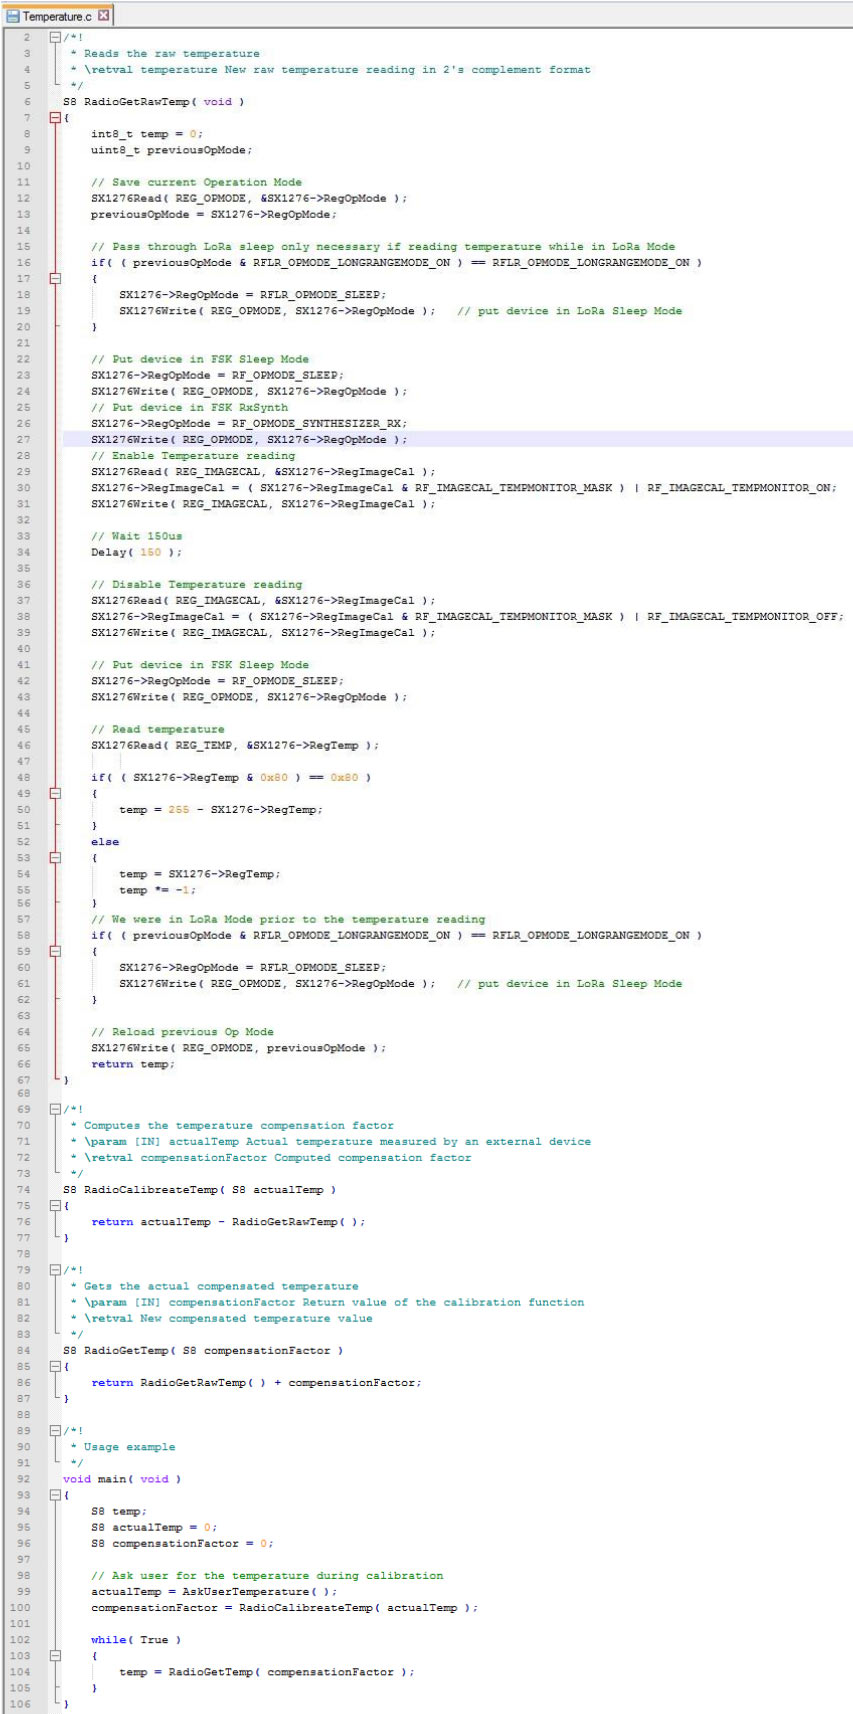
5.Example Temperature Reading

The following routine(s) may be implemented to read the temperature and calibrate the sensor.

DWM-JL1295-datasheet-Example-Temperature-reading

DWM-JL1295-datasheet-Example-Temperature-reading

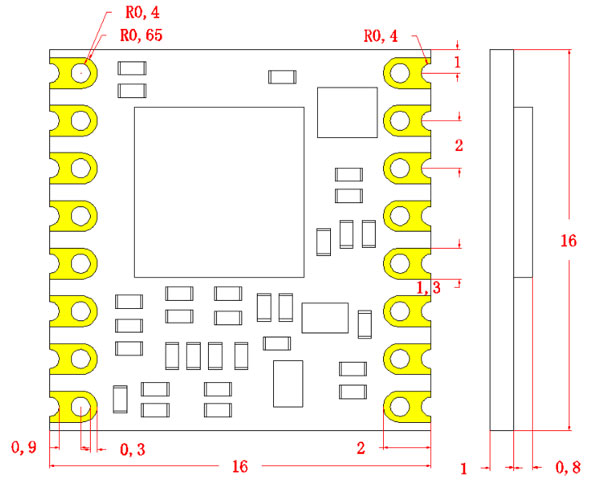
6.Packaging Information

DWM-JL1295-datasheet-packaging

DWM-JL1295-datasheet-packaging

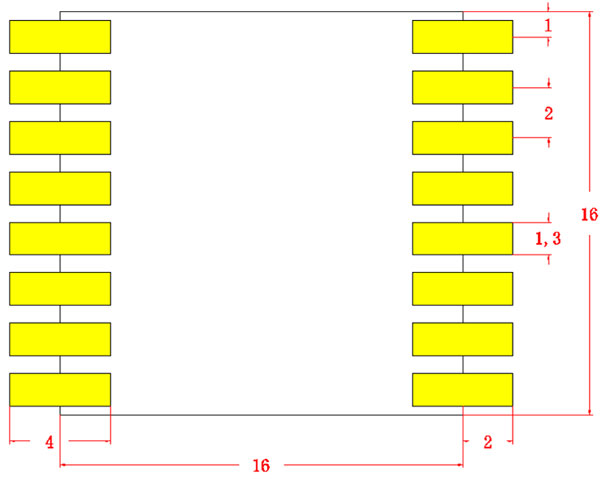
7.Recommended PCB Land Pattern

8. Demo code

 DWM-LJ1295 Demo code

CTT180610647ENA ROHS

CTT180610647ENB REACH

If you want to get the samples pls visit the online shop DWM-LJ1295.

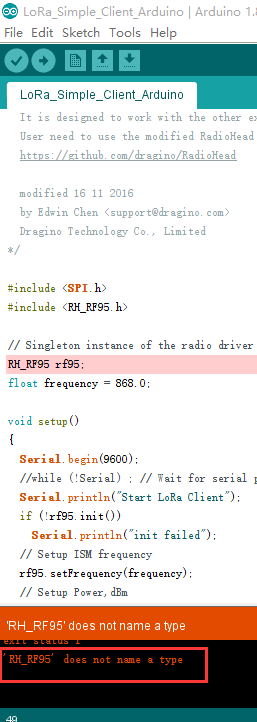
Solved the problem “RH_RF95 Does not name a type”

Solved the problem “RH_95 Does not name a type”

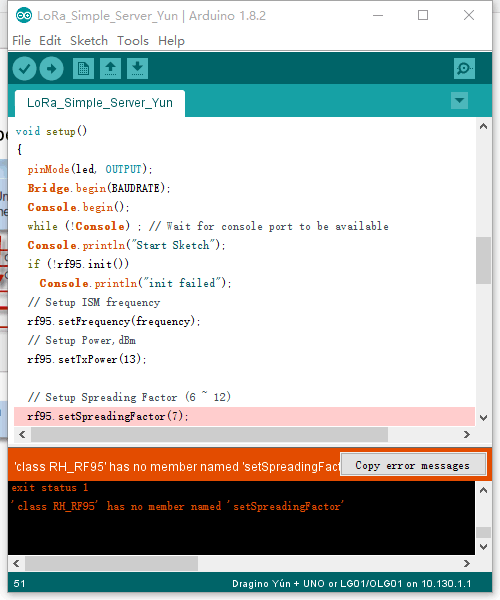
The Developers or users may face a problem when they follow the step of the user manual try to Upload a sketch to the Dragino Lora gateway LG01-S or Upload Sketch to Lora shield board by using the newest version Arduino-1.8.5. the compiler will show: class RH_RF95′ has no member named ‘setSpreadingFactor’ or RH_RF95 Does not name a type.

dwmzone-Solved-the -problem-RH_RF95 -Does-not -name-a -type-pro1

dwmzone-Solved-the -problem-RH_RF95 -Does-not -name-a -type-pro1


You may try many ways or search on the internet to find a way to solve the problems when the problems come.i have faced this problem and solved the problems successfully.
Here are my way and explanation:
1. The explanation
you may had used the old version Lora Library before like the version RadioHead-1.63 and add to the IDE as one library now the Dragino had been upgraded the newest version Lora library which is RadioHead-master the problems comes from the conflict between the old version and newest version Lora library(The newest version Lora library can be download from https://github.com/dragino/RadioHead/archive/master.zip).
2. The way solved the problems
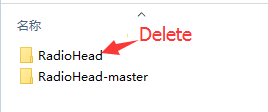
1) find the library file and delete the RadioHead file here is the route(you cant uninstall from the Library Manager)


C:\Users\Administrator\Documents\Arduino\libraries/RadioHead
2)find the cached file and delete the Arduino15 file here is the route(which will store the history data for the old version library)


C:\Users\Administrator\AppData\Local\Arduino15
3) Install the newest version Lora Library by using the Library Manager again.
Then problem solved you can try it again.

Lora Sensor Node-LSN50 User Manual and Case Study

INTRODUCTION

Dragino LoRa Sensor Node

Dragino LoRa Sensor Node

What is the LSN50

LSN50 is a Long Range LoRa Sensor Node. It is designed for outdoor use and powered by Li/SOCl2 battery for long term use power consumption and secure data transmission.It is designed to facilitate developers to quickly deploy industrial level LoRa and IoT solutions. It help users to turn the idea into a practical application and make the Internet of Things a reality. It is easy to program, create and connect your things everywhere.

It is based on SX1276/SX1278 allows the user to send data and reach extremely long ranges at low data-rates.It provides ultra-long range spread spectrum communication and high interference immunity whilst minimising current consumption.It targets professional wireless sensor network applications such as irrigation systems, smart metering, smart cities, smartphone detection, building automation, and so on.

LSN50 uses STM32l0x chip from ST, STML0x is the ultra-low-power STM32L072xx microcontrollers incorporate the connectivity power of the universal serial bus (USB 2.0 crystal-less) with the high-performance ARM® Cortex®-M0+ 32-bit RISC core operating at a 32 MHz frequency, a memory protection unit (MPU), high-speed embedded memories (192 Kbytes of Flash program memory, 6 Kbytes of data EEPROM and 20 Kbytes of RAM) plus an extensive range of enhanced I/Os and peripherals.

LSN50 is an open source product, it is based on the STM32Cube HAL drivers and lots of libraries can be found in ST site for rapid development.

Introdution2.jpg

STM32l0x

  • The maximum link budget is 157 dB
  • +20 dBm, 100 mW constant RF output with Vsupply
  • +14 dBm high efficiency PA
  • Programmable bit rates up to 300 k
  • High sensitivity: down to -137 dBm
  • Bulletproof front end: IIP3 = -12.5 dBm
  • 89 dB blocking immunity
  • The low RX current is 10 mA and the register is held at 200 nA
  • Fully integrated synthesizer with 61 Hz resolution
  • FSK, GFSK, MSK, GMSK, LoRa and OOK modulations
  • Bit built-in synchronizer for clock recovery
  • Synchronous word recognition
  • Preamble detection
  • 127 dB + dynamic range RSSI
  • Built-in temperature sensor and low battery indicator 1.65 V to 3.6 V power supply

Specifications

MCU Side:

  • MCU: STM32L072CZT6
  • Flash:192KB
  • RAM:20KB
  • EEPROM: 6KB
  • Clock Speed: 32Mhz

LoRa Side:

  • LoRa Chip: sx1276/sx1278
  • 68 dB maximum link budget.
  • +20 dBm – 100 mW constant RF output vs.
  • +14 dBm high efficiency PA.
  • Programmable bit rate up to 300 kbps.
  • High sensitivity: down to -148 dBm.
  • Bullet-proof front end: IIP3 = -12.5 dBm.
  • 127 dB Dynamic Range RSSI.
  • LoRaWAN 1.0.2 Specification

Absolute Maximum Ratings:

  • I/O pins: 0.5v ~ VCC+0.5V

Common DC Characteristics:

  • Supply Voltage: 2.1v ~ 3.6v
  • Operating Tempature: -40 ~ 85°C
  • I/O pins: Refer to STM32L072 datasheet

Power Consumption:

  • STOP Mode: 2.7uA @ 3.3v
  • LoRa Transmit Mode:

125mA @ 20dBm 44mA @ 14dBm

Battery:

  • Li/SOCI2 unchargable battery
  • Capacity: 4000mAh
  • Self Discharge: <1% / Year @ 25°C
  • Max continuously current: 130mA
  • Max boost current: 2A, 1 second

Dimensions:

  • Size:65 x 50 x 50mm
  • Net Weight: 140g

Features

  • STM32L072CZT6 MCU
  • SX1276/78 Wireless Chip
  • Pre-load bootloader on USART1/USART2
  • MDK-ARM Version 5.24a IDE
  • I2C,LPUSART1,USB
  • 2x12bit ADC, 1x12bit DAC
  • 18xDigital I/Os
  • LoRa™ Modem
  • Preamble detection
  • Baud rate configurable
  • CN470/EU433/KR920/US915
  • EU868/AS923/AU915
  • Open source hardware / software
  • Available Band:433/868/915/920 Mhz
  • IP66 Waterproof Enclosure
  • Ultra Low Power consumption
  • AT Commands to change parameters
  • 4000mAh Battery for long term use

Applications

  • Wireless Alarm and Security Systems
  • Home and Building Automation
  • Automated Meter Reading
  • Industrial Monitoring and Control
  • Long range Irrigation Systems,etc.

Getting Start

Power On/Off the LSN50

The LSN50 is power off before shipping to avoid accident during shipping. We use a jumper to power on/off the LSN50, This will be useful for monitoring power consumption when connecting to different sensors and with different software. User can power on the device by simply adding the jumper to the board , as below.

Power on.jpg

Use the AT Command

  • AT0 1.png

  • steps
  1. NEW LSN50 1.png

  2. Connect USB 1.png

  3. Open application Seral port and click Start

  4. You can see the status of the interface(If it does not appear, press the reset button or the AT command: ATZ.)

  5. Input commands: Ex)AT+ADR=0(Adaptive rate is off).If your AT command is sent successfully, the software will receive feedback (OK).

  • Tips:If you want to know the more commands,you can send: AT+?.)

Program LSN50

  • Download Flashloader(Here is just sample application.You can also use the same type of programming application.And the method is similar.) and download STM32CubeExpansion_LRWAN.zip(Include source code).

Steps

  • Please follow the below of examples:

Follow the picture to find the program file.

Open this file.

Promgram4 1.png

Program3.png

Program5 1.png

Program6 1.png

Program7 1.png

Program8 1.png

Result

Program9 1.png

Program10 1.png

Current consumption test in “Stop mode” mode

  • Remove the jumper from JP2, connect with a multimeter, and hit 20uA.

Pin Definition

Introdution.png


Case Study 1: With Oil Sensor

Schematic

  • The Oil Sensor is a sliding variable resistance, floating through the float above the circuit to change the size of the resistance.

Yuanlitu 1.png

Schematic 2.png

Connection steps

OILSENSOR 1.jpg

Connect 2.png

Connect 3.png

Calculation method

  • Only for our LSN50 such as:

(TTN) The value of the first two above is 00 00, which is 0
H = 0 * 3.0 * 1000 / (3.0 * 4095) (mm)
If (TTN) data = 00 10 is 16
H = 16 * 3.0 * 1000 / (3.0 * 4095) (mm)

Case Study 2: With DS18B20 Temperature Sensor

Schematic

  • DS18B20 Temperature range is -55~125℃.

The delay time when the temperature changes is 750ms.Temperature measurement error is 0.5 ℃. The programmable resolution is 9~12 bits.

DS18YUANLI.png

Connection steps

DS18B.png

DS18B 1.png

Calculation method

  • The DS18B20 is configured as 12 bits at factory shipment. When reading the temperature, a total of 16 bits are read. The first 5 bits are sign bits. When the current 5 bits are 1, the read temperature is negative. When the current 5 bits are 0, Take the temperature is positive. When the temperature is positive read method: the hexadecimal number can be converted into decimal. When the temperature is negative, the reading method is: add 1 after the hexadecimal inversion, and then convert it to 10 hexadecimal. Example: 0550H = +85 degrees, FC90H = -55 degrees.

Order Infomation

Order Info- LSN50-XX-YY

XX:

  • 433: Best Tuned at 433Mhz
  • 868: Best Tuned at 868Mhz
  • 915: Best Tuned at 915/920 Mhz

YY:

  • 12: With M12 waterproof cable hole
  • 16: With M16 waterproof cable hole
  • 20: With M20 waterproof cable hole

RFduino Board & LoRa module as DK board User guide

     RFduino Board original design for all of the Wireless modules can share with same Library and can run a Wireless communication code with the RFduino Board.This User guide will show you how to use the RFduino Board to delevelop the RFM92W,RFM95W,RFM96W,RFM98W  LoRa module etcs.

    RFduino Board which also name HopeDuino But we used to call it as RFduino board.If there are any questions please contact us sales@odlstore.com. We will give more details about the name.

If you are  the firt time use the   RFduino Board please visit the  RFduino Board User Manule.

  1. Prepare Hardware and software:

2. Operation

 1.) Set two RFM9X LoRa module to The RFduino Board .
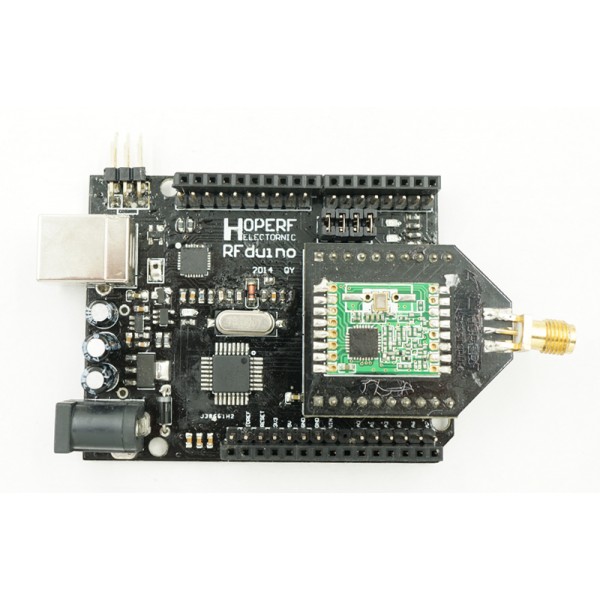
rfduino-board

2.) Connect the RFduino Board to the PC by USB cable.

   3.) Opens the Arduino IDE interface, click on the [file] – > [Examples] -> [HopeRFLib] ->[lora_Tx], below operation;

   4.) Opens the Arduino IDE interface, click on the [file] – > [example] -> [HopeRFLib] -> [lora_Rx], the following figure.
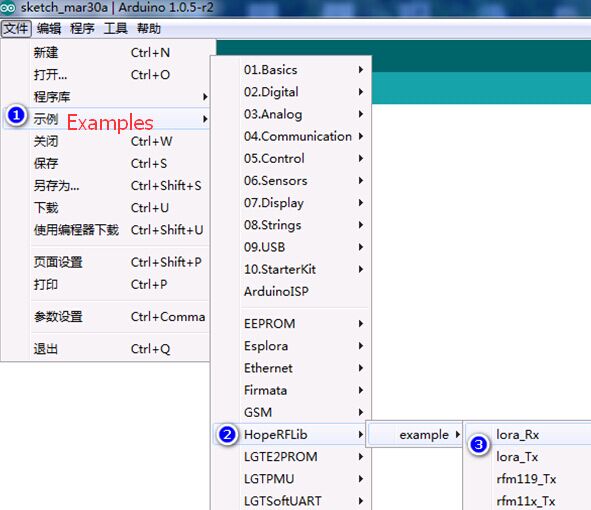
Dwmzone-LoRa-module-RFduino-board

5.) Compile and download the Software.

Since there are two USB cable connect to one PC and one Aduino ID there are onething need to be carefull that’s the Serial port,each of time you compile and download the LoRa_Tx and LoRa_Rx You have to choice the correct Serial Port.You can see the serial port on the right down corner which shows as below:
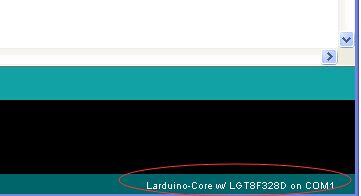
Dwmzone-LoRa-module-RFduino-board-serial-poart

 6.) Serial Port Monitor the TX and RX communication.

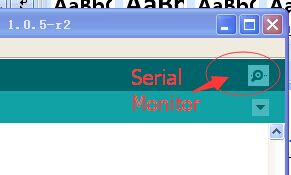
After Compile and download the Software the TX will start the wireless transmission periodically and you can set the Rx serial port and check the received data package by click the “Serial Mornitor”.
Dwmzone-LoRa-module-RFduino-board-serial-poart-monitor

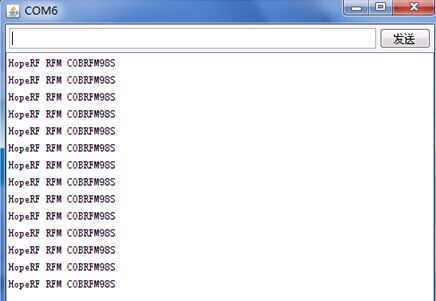
It will open a new windows and display the data received.shows as below:
Dwmzone-LoRa-module-RFduino-board-serial-poart-data

Note: You can check the UART Library  which content the function for UART communiction here is the Route: HoepRF-HSP->libraries->HopeRFLib -> HopeDuino_UART.

3.Paremeter Definition and Description.

“LoRa. H” and “LoRa. CPP” library file repository paths in the Arduino IDE folder/libraries/HopeRFLib;

  •  FreqStruct
    Type:  Union type
    Description: for RFM9X frequency register definition
    Content: the Freq, long, 4 bytes, frequency values;
            FreqL, bytes, in view of the Freq split the low frequency values of 8 [0:7];
            FreqM, bytes, in view of the Freq split the frequency values of 8 [8:15];
            FreqH, bytes, in view of the high Freq split frequency values of 8 [16:23];
            FreqX, byte, redundancy, rounding 4 bytes, No meaning.
  • Modulation Type
    Type: enum-type
    Description: select Modulation and demodulation system
    Content: OOK, FSK, GFSK, LORA
    OOK: ON-Off – the Key ;
        FSK:  Frequency – Shift – Key:
       GFSK: FSK modulation with gaussian filtering;
        LoRa :Semtech characteristic spread spectrum modulation technique.
  • moduleType
    Type: enum-type
    Description: select the target module models
    Content: LoRa module EVB/DK Kits(RFM92W,RFM95W,RFM96W,RFM98W).
  • sfType
    Type: enum-type
    Description: define LoRa mode, spreading factor (SF – spreading factor)
    Content:  SF6, SF7 SF8 SF9, SF10, SF11, SF12.
  • Modulation
    Type: modulationType type
    Description: define modulation demodulation system, OOK, FSK, GFSK,LoRa by selecting one of the them.
  • COB
    Type: moduleType type
    Description: definition module model, COB said Chip – On – Borad, can be choice from LoRa module EVB/DK Kits(RFM92W,RFM95W,RFM96W,RFM98W).
  • Frequency
    Type: type lword (unsigned long)
    Description: the target operating Frequency, the unit KHz, such as: Frequency = 433920, on behalf of 433.92 MHz.
  • SymbolTime
    Type: type lword (unsigned long)
    Description: the target rate, the unit ns, such as: SymbolTime = 416000, representing 416 us each symbol, It means the rate is 2.4 kbps.
  • Devation
    Type: type lword (unsigned long)
    Description: the target work frequency deviation, in view of the FSK and GFSK launch needs to be defined, unit KHz, for example: Devation = 45, It means the Frequency Deviation is 45 KHz.
  •  BandWidth
    Type: type of word (unsigned int)
    Description: the target work receive BandWidth, for receiving need to define the unit KHz, for example: BandWidth = 100, on behalf of the receiving BandWidth is 100 KHz.
  • OutputPower
    Type: unsigned char
    Description: the target output power, in view of the need to define the launch, range 2-20, unit dBm, for example, is set to 10 means the Output Power is 10 dBm.
  • PreambleLength
    Type: type of word (unsigned int)
    Function: Preamble of packet length setting, need to be configured for launch, byte units.
  • CrcDisable
    Types: bool type
    Description: choose whether or not to bring in a packet function CRC, set true representative prohibit CRC function;Set up false open CRC function.
  • FixedPktLength
    Types: bool type
    Description: define packet is fixed packet length, or longer packets, set true representative fixed packet length;Set the false on behalf of the variable-length packet format.
  • SyncLength
    Types: Byte type
    Description: wireless packet format, the synchronization word length, set the range is 1 ~ 8 bytes;Cannot be set to zero bytes.
  • SyncWord [8]
    Type: an array of bytes
    Description: set the packet format, the synchronization word, the content of the need and SyncLength set in accordance with (length).
  • PayloadLength
    Types: Byte type
    Description: in fixed packet length model, defining fixed packet length.
  • SFSel
    Type: sfType type
    Description: set LoRa mode of spread spectrum factor, can choose SF6, SF7, SF8, SF9, SF10, SF11, SF12 one of them.
  • BWSel
    Type: bwType type
    Description: set LoRa mode emission bandwidth parameters, can choose BW62K, BW125K, BW250K, BW500K one of them.
  • CRSel
    Type: crType type
    Description: set the CodeRate LoRa mode, can choose CR4_5, CR4_6, CR4_7, CR4_8 one of them.
  • PayloadLength
    Type: Byte type:
    Description: in fixed packet length model, defining fixed packet length.
  •  SFSel
    Type: sfType type
    Description: set LoRa mode of spread spectrum factor, can choose SF6, SF7, SF8, SF9, SF10, SF11, SF12 one of them.
  • BWSel
    Type: bwType type
    Description: set LoRa mode emission bandwidth parameters, can choose BW62K, BW125K, BW250K, BW500K one of them.
  • CRSel
    Type: crType type
    Description: set the CodeRate LoRa mode, can choose CR4_5, CR4_6, CR4_7, CR4_8 one of them.

4.Function Definition and Description.

  • vInitialize
    Type:Function
    Parameter: none
    Return value: none
    Description: initialization module (chip), suitable for RFM66 module, the program started calling;Before the call, it is necessary to the foregoing associated variable is set to complete.Initialization function after the configuration (including call vConfig function), that module (chip) for Standby state, namely, not hair, not closed, not sleep.
  • vConfig
    Type: Function
    Parameter: none
    Return value: none
    Description: configuration parameters to the module (chip), applicable to the program need to reconfigure the parameters in the process of work.Also need to complete the associated variable is set before invoking it.If the associated variables set up complete, the follow-up is unchanged, only want to reconfigure a parameters, can be called directly;If need in the process of work, the work of switching frequency, etc., need to modify the relevant parameters, and then in the call.After the call, need to use working mode switching function, so that the chips accurately to the specific work mode, the mode switching function are: vGoRx, vGoStandby, vGoSleep etc.
  • vGoRx
    Type:Function
    Parameter: none
    Return value: none
    Description: configuration module (chip) into the receive mode.
  • vGoStandby
    Type: Function
    Parameter: none
    Return value: none
    Description: configuration module (chip) to enter standby mode.
  • vGoSleep
    Type: Function
    Parameter: none
    Return value: none
    Description: configuration module (chip) into sleep mode.
  • bSendMessage
    Type: function
    Parameter: MSG [], unsigned char pointer type, with emission data array called entrance (pointer);Length, unsigned char types, to launch the data length, the unit is byte;
    Return Value: returns a bool type, true indicates the successful launch;False indicates failure to launch, such as: push a timeout, and so on and so forth;
    Description: the data are sent to launch, just send a (a frame);Sent after the completion of automatic return to Standby mode (Standby mode).
  • bGetMessage
    Type: Function
    Parameter: MSG [], unsigned char pointer type, calls for receiving data array entry (pointer);
    Return Value: return value is the length of the receiving data, if it returns 0 means no received data;
    Description: query whether receives the data, the query object is chip output IO state, if not received data, returns 0;If the received data, returns the length of the received data, after the charge, module (chip) is still in a state of receiving.

5.PIN definition

RFDuino Board MCU (Lgt8f328) RFM9x modules(Or Chipset)
13 PB5 SCK
12 PB4 MISO
11 PB3 MOSI
10 PB2 nCS
9 PB1 POR
8 PB0 DIO0
7 PD7 DIO1(Jumper
6 PD6 DIO2(Jumper)
5 PD5 DIO3(Jumper)
4 PD4 DIO4(Jumper)