Category Archives: Shoping in HUAQIANGBEI

I will updata some pictures which are from the store of HUAQIANGBEI. The are thousands of products and device. If there are some parts your are trying to get but cant find on the local market please contact us we will help you to get that parts from the HUAQIANGBEI electronic market.

AT Command for UHF/VHF Walkie Talkie radio module

Description

The default working mode of the module is wideband, the transmit/receive frequency points are 150.050MHz, and the transmit/receive subcarriers are 67Hz. If no AT command is received to change the parameters, the module will work according to the default parameters. 
In data communication mode, the PTT pin must remain high. 
The normal operation of the module requires a 3.6-4.2V power supply and at least 1A of current. When the PD pin is at a high level, the module works. When the PD pin is at a low level, the module is turned off.

1. After the module is powered on, if no AT command is received, the default working parameters are: Bandwidth: Wideband 
Transmit frequency: 150.050MHz  
Receive frequency: 150.050MHz
Transmit subcarrier: 67Hz 
Receive subcarrier: 67Hz
Squelch level: 2
Scrambler: Off 
Compression: Off
Transmit timeout: Off
MIC sensitivity: 6
Audio output level: 62. In data communication mode, the PTT pin cannot be low level. 3. Working conditions of the module:Recommended DC voltage: 3.6-4.2V, the power supply must provide more than 1A current; 
The PD pin of the module must be high level; 
PD can be used as the on/off control pin of the module. 

AT command type

1) Command without parameter:

AT+<command>,eg.:AT+DMOCONNECT

2) Command with parameter:AT+<command>=<par1>,<par2>,<par3>…

3) Response command format are as below :

<CR><LF><command string>

<CR><LF>

<CR> Enter,0x0D

<LF> Newline,0x0A。

1.2 AT Command format

All the AT command started with “AT”, And ended with<CR>。

The UART port default setting are as below:

8 bit data,

1 bit stop,

without parity ,

CTS/RTS,

9600 baut

ATcommand response format:

<CR><LF><command string><CR><LF>

Simplified instruction for SR105, SR110 and SR120 Serial for the older version SR-FRS-V and SR-FRS-U AT command you can visit this link: https://docplayer.net/91122125-Sr-frs-0w5-wireless-transmit_receive-data-transfer-module-uhf-vhf-uart-communication-protocol.html

AT+DMOGRP(old version command AT+DMOSETGROUP ): Set transmit frequency, receive frequency, sub audio, bandwidth, busy channel lockout, transmit power. 

Description: Set frequency, sub audio frequency, power, bandwidth and other parameters.

Format: AT+DMOGRP=RFV,TFV,RXCT,TXCT,Flag,Flag1Example (text input):
AT+DMOGRP=450.02500,450.02500,RR,TT,0,0  (Carriage return/line feed)
Because RR and TT represent sub audio frequencies, they cannot be entered directly in text format; see explanation below. RFV, TFV, frequency values, must be 5 digits after the decimal point.

Example (HEX input):
41 54 2B 44 4D 4F 47 52 50 3D 34 35 30 2E 30 32 35 30 30 2C 34 35 30 2E 30 32 35 30 30 2C 70 06 2C 70 06 2C 30 2C 30 0D 0A Response:
+DMOGRP:0 Success
+DMOGRP:1 Failure

Parameter description:

RFV: Receive frequency value:400.00000-480.00000MHZ (integer multiple of 6.25K or 2K5)
TFV: Transmit frequency value:400.00000-480.00000MHZ (integer multiple of 6.25K or 2K5)
Note: The transmit frequency and receive frequency can be the same frequency or different frequencies (ASCII)
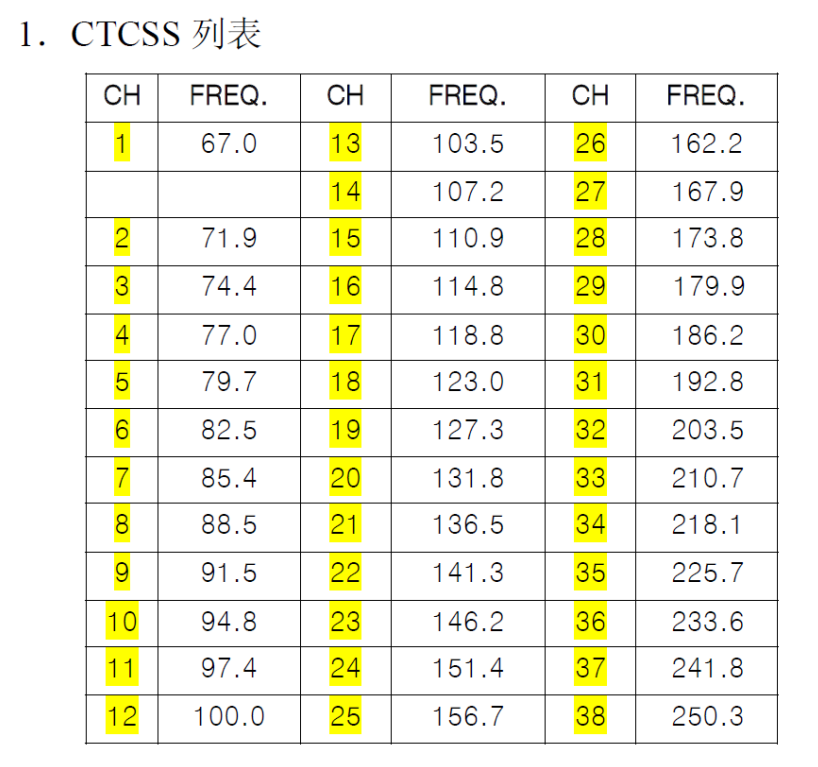
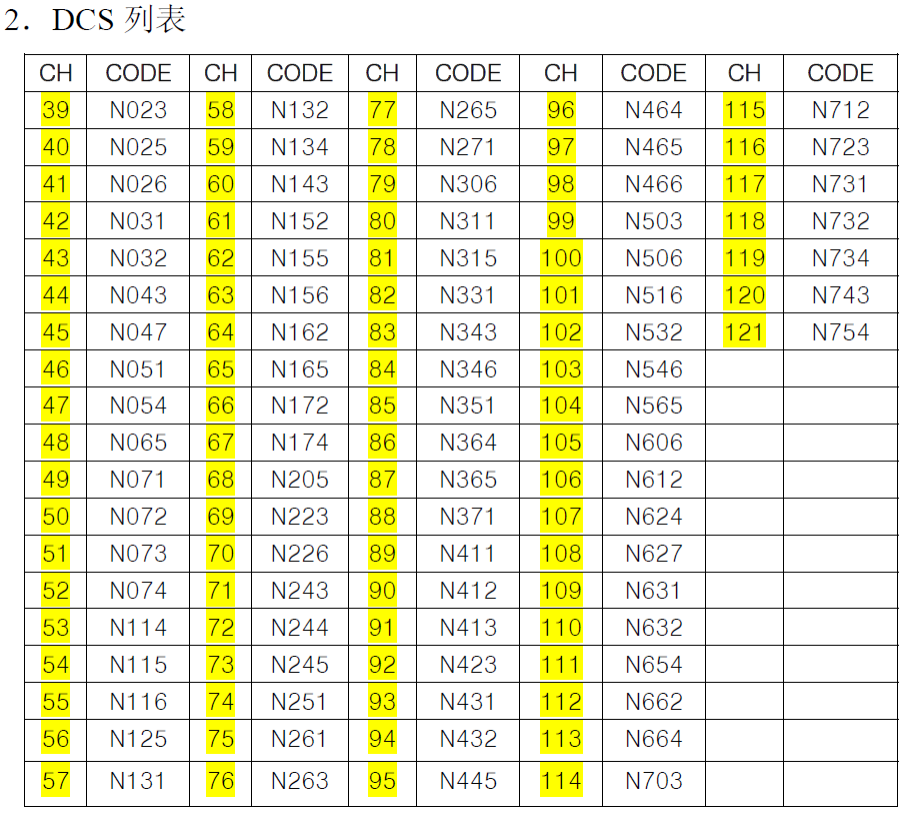
RXCT: DO D1 Receive coding has 2 BYTES. (Hexadecimal number)
Format: BCD code (see explanation below)
The low four bits of RXCT1 are the decimal part. If DEC is not set, fill in FF FF. For example:
67.7 D0D1 data 0x77 0x06 
D023N D0D1=23
80 D244N D0D1=44
82 D023I D0D1=23 
C0 D251I D0D1=51 C2
TXCT: Transmit encoding (hexadecimal number), the same as receive encoding.
Flag: (ASCII)
Bit0 Busy channel lockout (0: Off 1: On) (default off)
Bit1 Wide/narrow band (0: Wideband 1: Narrowband) (default wideband)
FLAG = bit1 *2+ bit0;
Flag1: (ASCII) (Invalid for SR105U model, please set FALG1 to 0)
Bit0 High/low power (0: High power 1: Low power) (default high power)
Default: Transmit/receive frequency 450.05000, sub audio 67Hz.
FLAG1 = 0; 

1. RXCT and TXCT are HEX, not ASCII, so commands cannot be sent directly in text format. For example:Enter the command in text mode on the computer:
AT+DMOGRP=450.02500,450.02500,RR,TT,0,0(press Enter)In the PC serial port tool, switch to send in hexadecimal (HEX) format. The result is:
41 54 2B 44 4D 4F 47 52 50 3D 34 35 30 2E 30 32 35 30 30 2C 34 35 30 2E 30 32 35 30 30 2C 52 52 2C 54 54 2C 30 2C 30 0D 0A
Red represents RR, TT corresponding positions
R R  T TIf the sub audio frequency you need is 67.0, after format conversion, the corresponding sub audio is 70 06; Replace RR and TT with 70 06, so the correct command is:
41 54 2B 44 4D 4F 47 52 50 3D 34 35 30 2E 30 32 35 30 30 2C 34 35 30 2E 30 32 35 30 30 2C 70 06 2C 70 06 2C 30 2C 30 0D 0A
Then click Send.Note:
1. Sub audio setting method:
1) For analog sub audio 
For example: 67.0 67.0 →06 70→ D0 D1= 70 06 
250.3 250.3 →25 03→ D0 D1= 03 25
2) For digital sub audio 
Positive polarity D1 MSB is 8; for example: 
D023N 023→8023→ D0 D1=23 80 
D244N 244→8244→ D0 D1=44 82
Negative polarity D1 MSB is C;
D023I 023→C023→ D0 D1=23 C0
D251I 251→C251→ D0 D1=51 C22. FLAG/FLAG1 setting method
BIT1 BIT0 according to the 8421 BCD code to take the value
FLAG = BIT1 * 2 + BIT0
FLAG1 = BIT1 * 2 + BIT0
For example:
1) FLAG: Bit1 = 1; bit0 = 0
FLAG corresponds to BCD code 2 + 0 = 2; FLAG set value is 2;
2) FLAG: Bit1 = 1; bit0 = 1
FLAG corresponds to BCD code 2 + 1 = 3; FLAG set value is 3; 
2) FLAG: Bit1 = 0; bit0 = 1
FLAG corresponds to BCD code 0 + 1 = 1; FLAG set value is 1; 

AT+DMOSAV(old version command AT+DMOAUTOPOWCONTR ): Automatic power saving function setting

CommandDescription: Set the automatic power saving function of the module. 

Format: AT+DMOSAV=X

Example:
AT+DMOSAV=0(Carriage return/line feed)

Response:
+DMOSAV:0 Success
+DMOSAV:1 Failure 

Parameter description:
X:
0 Set power saving on 
1 Set power saving off 
(The default is 0, automatic power saving is turned on) 

AT+DMOVOL( old version command AT+DMOSETVOLUME ): Output volume setting 

Description: Set the audio output volume level of the module. The larger the value, the greater the volume. Format: AT+DMOVOL=X 

Example: 
AT+DMOVOL=1 (Carriage return/line feed) 

Response: 
+DMOVOL:0 Success 
+DMOVOL:1 Failure  

Parameter description:
X: Volume level parameter value range: 1-9 
(The default is 6) 

AT+DMOVOX( old version command AT+DMOSETVOX ): Voice control function setting  

Description: Set the voice control trigger sensitivity of the module. The larger the value, the more sensitive the trigger.

Format: AT+DMOVOX=X

Example:  AT+DMOVOX=0 (Carriage return/line feed)

Response:
+DMOVOX: 0 Success 
+DMOVOX: 1 Failure 

Parameter description: 
X: Voice control level parameter value is 0-8 levels,  (default off) 
0: Turn off voice control trigger transmission 
1-8: Turn on voice control and represents the sensitivity level of voice control trigger.  (The default is 8) 

AT+DMOFUN( old version command AT+DMOSETMIC ): Parameter settings: squelch level, MIC sensitivity, transmit timeout, compression, scrambling 

Description: Set the parameters of the module: squelch level, transmit timeout, MIC sensitivity, scrambling, compressionFormat: AT+DMOFUN=SQL,MICLVL, TOT,SCRAMLVL ,COMP Example: 
AT+DMOFUN=2,6,0,0,0(Carriage return/line feed) Response: 
+DMOFUN:0 Success 
+DMOFUN:1 Failure  

Parameter description: 
SQ: Squelch level: 0-8 (0: Monitor mode)
MICLVL: MIC sensitivity level parameter value is 0-8 levels (default level 5) 
TOT: Transmit timeout, setting range: 0~9; (default off)
0: Turn off transmit timeout 
1~9: Represent transmit timeout 1 minute to 9 minutes respectively)
SCRAMLVL: Scrambling function parameter value 0-7.  (0 means scrambling is off), (default off)
COMP: Compression function switch 
0: Off 
1: On (default off)

AT+DMOMES(old version command AT+DMOMES ) SMS sender sending command 

Description: Set the SMS sending function of the module, air rate 1200 baud rate 

Format: AT+DMOMES=Lxxxxxxx Example: 
AT+DMOMES=7ABCDEFG(Carriage return/line feed)    
41 54 2B 44 4D 4F 4D 45 53 3D 07 41 42 43 44 45 46 47 0D 0A

Response: 
+ DMOMES:0 Success 
+ DMOMES:1 Failure  

Parameter description:
L: The character length of the SMS (hexadecimal number, maximum length 70BYTE).
XXXXXXX: SMS content

Notes:
1. When sending SMS in text format, the “7” in the text actually represents 0X37 and will be wrong. Before sending, you must switch to HEX format to send, and manually change 0X37 to 0X7.
Text input, directly converted to HEX, the length here is wrong:
41 54 2B 44 4D 4F 4D 45 53 3D 37 41 42 43 44 45 46 47 0D 0A 
You need to change 37 to 07, correct as follows:
41 54 2B 44 4D 4F 4D 45 53 3D 07 41 42 43 44 45 46 47 0D 0A2.

Note: The new modules cannot be compatible with the old products of the same type.

AT+DMODTF DTMF: sending and receiving (please contact customization, the standard shipping version does not contain this function)  

 Send DTMF signal

Description: Send DTMF digits 0-9 or letters ABCD*#

Format: AT+DMODTF=XY Example: AT+DMODTF=09 

Response: 
+DMODTF:0 Success
+ DMODTF:1 Failure Parameter description: 
XY send digits 
00 send DTMF code: 0 
01 send DTMF code: 1 
02 send DTMF code: 2 
03 send DTMF code: 3 
04 send DTMF code: 4
05 send DTMF code: 5 
06 send DTMF code: 6 
07 send DTMF code: 7 
08 send DTMF code: 8
09 send DTMF code: 9
XY send characters:  
10 send DTMF: A
11 send DTMF: B
12 send DTMF: C 
13 send DTMF: D
14 send DTMF: *
15 send DTMF: # 

Receive DTMF signal  

Description: After the module demodulates the received DTMF, it automatically uploads it through the serial port. 

Format: +DMODTF:XY Example: +DMODTF:09 

Response:  None

Parameter description: 
XY received digits  
00 received DTMF code: 0 
10 received DTMF code: 1 
11 received DTMF code: 2
12 received DTMF code: 3
13 send DTMF code: 4
14 received DTMF code: 5
15 received DTMF code: 6 
16 received DTMF code: 7
17 received DTMF code: 8 
18 received DTMF code: 9
XY received characters: 
10 received DTMF: A
11 received DTMF: B 
12 received DTMF: C
13 received DTMF: D
14 received DTMF: *
15 received DTMF: # 

AT+DMOCONT: Handshake instruction, communication connection test

Description: Communication handshake command 

Format: AT+DMOCONT Example: AT+DMOCONT (Carriage return/line feed) 

Response:  +DMOCONT:0 

Parameter description: None. 

AT+DMOREST: Restore factory settings

Description: Reset all parameters to factory default settings 

Format: AT+DMOREST 

 Example: AT+DMOREST (Carriage return/line feed) 

Response: +DMOREST:0  

Parameter description: None. 

AT+DMOEND: Tail tone setting 

AT+DMOEND Echo tail setting (please contact customization if needed, standard shipping version does not contain this function) 

Description: Turn on or off echo tail setting 

Format: AT+DMOEND=X 

Example: AT+DMOEND=0 (Carriage return/line feed)

Response: +DMOEND:0  

Parameter description: 
X is an on/off switch to open or close the echo tail function 
0: Turn on echo tail; (default) 
1: Turn off echo tail;  

Special instructions: Unless there is a clear requirement, please be sure not to turn off the echo tail. Turning off the echo tail will cause a large noise when the receiving end closes the speaker at the end of transmission. 

AT+DMORSSI: RSSI signal strength query

Description: Query received signal strength, 

Format: AT+DMORSSI  

Example: AT+DMORSSI (Carriage return/line feed) 

Response: + DMORSSI:XXX XXX is the signal strength value, just a relative value;

Parameter description: 
XXX: 000-127 

Data reference: (The larger the returned value, the stronger the signal)

Receiving sensitivity: RSSI
OFF <30
-120 036
-110 046
-100 055
-90 065
-80 075
-70 085
-60 094
-50 103
-40 115
-30 127
-20 127
-10 127
0 127

1. Parameter settings can be retained after power off; 
2. After the module is powered on, you must delay 0.5S before setting various parameters of the module; 
3. Parameters cannot be set when the module is in the transmit state; 

AT+DMOVERQ: Query software version number 

Description: Query module version command 

Format: AT+DMOVERQ 

Example: AT+DMOVERQ  (Carriage return/line feed) 

Response:+DMOVERQ:105U-VXXX  

Parameter description: 
XXX is the software version number, such as 100 

WT51822-S4AT User Manual-Serial AT commands

WT51822-S4AT Serial transparent transmission means that modules are connected with user MCU via a common serial interface to establish a two-way communication between user MCU and mobile devices. The module can obtain at least 200bytes transmission data and automatically send the data by separated packets, each wireless packet maximum load is 20byte. The data packet, which is sent to the module by mobile device side, must send subcontracting automatically(1-20byte/package), the module will forward to the MCU serial receiving port after receiving the data packet. Users can modify the module basic Bluetooth parameters serial AT commands. For details, please check “serial AT command” description.

1. Serial hardware protocol: default 9600bps. 8, No verify bit 1, Stop bit

2.“Enable” serial ports enable control, low level enable module serial port function making data communication with the client host MCU properly; high level closes the serial port function. At this time, the module Bluetooth can still transmit broadcast code, and can be paired connection, but you can not use the serial port functions;

3.In order to save the size, the module uses the TXD / RXD double wire serial methods, without increasing the data flow control. So it is not recommended to set the serial rate too high, in caseof packet loss or error code, recommend to use 9600bps or other baud rates like no higher than 38400bps;

4.Bluetooth module default connection interval is 20ms, if you need to save power and adopt low-speed forwarding mode, you can adjust Bluetooth connection interval via the AT command, the longest interval Bluetooth connectivity is 2000ms;

Serial AT commands Description:

WT51822-S4AT Module will automatically recognize and distinguish serial data, the data packet began with AT character will be defaulted as AT commands and parsing, and will return the process results, so the data under transparent transmission mode cannot begin with AT character.

The test command

Command format: AT\r Syntax: AT \ r

Returning value: OK\r Return value: OK \ r

Content: send AT test commands, returning value OK indicates module AT commands tested successfully.

MAC address Operation Command

Command Format: AT + ADDR \ r?

Return Value: xxxxxxxxxxxx \ r

Content: Return the module‟s current MAC address: xxxxxxxxxxxx Command Format: AT + ADDR = 123456789ABC \ r Return value: OK \ r Content: modify the module MAC address again: 123456789ABC, return value OK indicates the success of reset MAC address. Note: If the Bluetooth module modified the module MAC address successfully under being connected state, but the module will not switch immediately to the new address , it needs to disconnect the module , then the module will be broadcast with a new MAC address.

Operation command of Serial Port Communication Baud-rate Command format: AT + BAUD = 19200 \ r

Return value: OK \ r ERROR \ r

Content: Re-edit module communication baud rate to 19200bps, Return OK indicates the success of modification, Return ERROR indicates that the new baud rate modification fails, the reason is set point value is not common serial port baud rate value. Command Format: AT + BAUD \ r? Return Value:19200\ r Content: Check the current module serial communication baud rate, the module returns the current setting of the baud rate 19200bps.

NOTE: The module default baud rate is 9600bps, because if the serial port baud rate is too high, it need to increase RTS / CTS data flow control, otherwise there will be errors, it is recommended that the baud rate is no more than 57600bps. The serial port baud rates that current module supports : 1200/2400/4800/9600/14400/19200/28800/38400/57600/76800/115200/230400。

Operation Command of the Device Name

Command Format: AT + NAME = Wireless-tag01 \ r

Return value: OK \ r ERROR \ r

Content: Rename the module: Wireless-tag01, the length of a name must be no more than 20 bytes, the return value OK indicates the success of the rename, the return ERROR represents the renamed fails, you may have exceeded the limit length . Command Format: AT + NAME \ r? Return Value: Wireless-tag01 \ r Content: Check the module‟s current device name, serial port return to the module‟s current device name: Wireless-tag01.

NOTE: Modify the device name under the state of the Bluetooth being connected, the module will not modify immediately .It needs to disconnect the Bluetooth connection, and then the module will broadcast with a new device name.

Read Command of Module Parameter

Command: AT + RX \ r

Return Value: NAME: Wireless-tag01 \ r BAUD: 19200 \ r MAC: 123456789ABC \ r

Contents: Check the module‟s current parameter, return to the module‟s current device name, serial port baud rate and device MAC address.

Set Command of Module Transmit Power

Command Format: AT + RFPM = 3 \ r

Return value: OK \ r ERROR \ r

Content: Reset the modules transmit power, for example ,set the module transmission power to level 4 ,the transmit power is -8dbm, return OK indicates power reset successes, return ERROR indicates power reset fails, the reason may the set power level is not in the level list.

Command Format: AT + RFPM \ r?

Return Value: -8dbm \ r

Content: Check the transmit power configuration of the currentBluetooth module, return to the current setting of the transmission power value: -8dbm. NOTE: Bluetooth module currently supports setting transmit power level in the following table:

Power Level Power Value

0 +4dbm

1 0dbm

2 -4dbm

3 -8dbm

4 -12dbm

5 -16dbm

6 -20dbm

7 -30dbm

8 -40dbm

Reset Module Command

Command Format: AT + RESET \ r

Return value: OK \ r

Content: Module reset command, returns OK, the module reset successes. 7-Restore the Default Configuration Commands

Command Format: AT + DEFAULT \ r

Return value: OK \ r

Content: Recover the module configuration parameters to the default parameters, MAC address will also restore to the factory default address, return OK indicates the module successful recovery.

Query Command of Module Version Number

Command Format: AT + VERSION \ r

Return Value: V1.0 \ r

Content: Query module current version, return to module current version V1.0.

Customized Broadcast Data Command

Command Format: AT + ADD = 0123456A \ r

Return value: OK \ r ERROR \ r

Content: Users can add the customized broadcast data in Bluetooth broadcast data, such as adding 0123456A data in Bluetooth broadcast data, returns OK indicates added successfully , returns ERROR indicates failure added, data length may exceed the maximum limit 16byte.

Serial Number Command of Customized Product

Command Format: AT + PID = ABCD \ r

Return value: OK \ r ERROR \ r

Content: customized product serial number added in the broadcast data, returns OK indicates that the custom has been added, add a custom return ERROR indicates failure, possibly because the custom data is beyond the scope required by the serial number, the serial number of the module supports the content within 0000-FFFF.

Setting Command of Bluetooth Broadcast Interval

Command Format: AT + ADP = 500 \ r

Return value: OK \ r ERROR \ r

Contents: Bluetooth Broadcasting valid interval is 100ms-4000ms, if re-configure the Bluetooth radio interval to 500ms, returns OK indicates reset successfully, ERROR indicates reset failed.

Reset Command of Bluetooth Connection Interval

Command Format: AT + CIT = 300 \ r

Return value: OK \ r ERROR \ r

Content: An active Bluetooth connection interval is 20ms-2000ms, if resetting Bluetooth connection time interval to 300ms, returns OK indicates reset successfully, the return ERROR indicates reset failed.

NOTE: The module does not support dynamic modification process connection interval, only work when restart the module after modification.

Setting command of low-power sleep mode

Command Format: AT + SLEEP \ r

Return value: OK \ r

Content: To reduce module power consumption, module in idle state can be used to set to sleep by the sleep command, and then Bluetooth is turned off, power consumption is reduced. Module in sleep mode can be wake-up by an external interrupt, external interrupt wake-foot there are: enable, test, reset three pins, any one external pin interrupt, the module can wake from sleep, wake up way: reset pin falling edge wake up, pin state switches from high level to low level; enable, test Pin rising edge wake up, the pin status is switched from low to high; the module wake-up reset to re-enter the work state.

Test Mode of Transparent Transmission

When the users get the module samples, they always want to first test module Bluetooth functions without the support from hardware serial. According to this usage, the module designed Bluetooth transparent transmission test mode to give a high level signal to the test mode control foot (TEST pin) to control Bluetooth module into the transparent transmission test mode. At this time, the module can normally connect with the mobile device terminal APP through Bluetooth. The module will automatically transmitted back to the mobile terminal equipment after receiving the data transmitted from APP, realize two-way data communication function between Bluetooth module and the mobile device terminal. After the test, released TEST pin high level, re-powering or reset the module to enter normal operation status.

BLE Protocol Description(app port)

[Service UUID: 0x1234 ]

Application Examples of Bluetooth Module

Accessibility BLE-DK, WT51822-DK is tool designed for easy use its Wireless-Tag BLE Bluetooth WT51822-S1/S2/S4AT. You can easily connect the Bluetooth module with PC through the WT51822-DK. The Bluetooth module works as slave device, can be searched and matched by Bluetooth master terminal. After matched, input the data to Bluetooth module via serial port debugging tools and the Bluetooth module resent the data to the master module; at the same time, the Bluetooth module can send the data received from the master module to the serial port debugging tools. Developers can easily check the data content between the Bluetooth module and the master terminal.

The connection method of DEMO-Kit Tools and Bluetooth module: DEMO-Kit Tools interface is the currently popular XBee interface. Bluetooth module connect with Kit Tools by XBee adapter board. Welding the module posted in the corresponding XBee adapter board, and then inserted the adapter board into the Kit tools.

XBee adapter plate shown as below:

DEMO-Kit tool uses a FTDI USB-to-UART chip. so before connecting with PC, you first need to install the FTDI chip driver. After driver installation is successful, connect DEMO-KIT with PC through the USB cable, then the PC side can identify DEMO-Kit tools serial numbers;

Open the serial debugging tools in PC terminal, for example, the serial debugging assistant, the port number is FTDI Chip mapping Virtual COM port number, the serial port parameters set as follows: 9600 baud,; data format is 8 data bits, No parity, 1 stop bit format, and then open the serial port, read and modify the current Bluetooth module settings by AT commands ,

as shown;

Search the slave devices by mobile APP terminal, you can use thepublicly recognized bluetooth test software LightBlue in IOS system, and you can also use our company‟s self-made Blurtooth serial APP testing software in Android system. After searched the device name of Bluetooth module, you can successfully paired by clicking itand establish a Bluetooth connection, and send data to a Bluetooth module through this APP tool to establish data communication between a mobile terminal and Bluetooth modules. A. In the IOS system (only iphone4S or above version phones support Bluetooth 4.0) use LightBlue to test module connect function. Firstly, open iphone Bluetooth, run LightBlue APP, when LightBlue is running, it will automatically search for the slave unit, the slave list will be displayed with some main information, UUID Services, transmitting power, device names etc

Click the slave unit you want to connect, iphone will connect with the salve, afterthis, the program will automatically search all services from slave machine, as shown below.

Enter into the service by clicking the cooresponding service , you can see some characteristics included in the Services, shown as below

Click „Write new value‟, will enter into the communication field of Characteristic, write the input value, as below:

Module will push the data sets to the serial port via DEMO-KIT after receiving the data from LightBlue which can be displayed on the serial debugging tools by PC side:

In the Android system (only Android 4.3 or above systems support Bluetooth 4.0) , you can use our company self-made APP serial debugging tools: Using APP tools to search for Bluetooth devices:

Connect with Bluetooth device, and input data in the serial transmission window, sends data to Bluetooth device, the module will push the data sets to the serial port via DEMO-KIT after receiving the data from LightBlue which can be displayed on the serial debugging tools by PC side:

You can also use PC side debug tool to send data to the APP serial tool by module, APP display window shows the data sent by Module

App serial tool received data and showed in the display window:

It will create more comvenience and shorten the development period of bluetooth project by using our DEMO-KIT tool and self made APP serial debugging tool

User’s Manual for MH-Z Series Infrared CO2 Sensor Module Communication Protocol

1.Profile for the communication protocol

●All the data in this communication protocol is hexadecimal.

●The data length is fixed 9 bits.

●Baud rate:9600, data bit:8, stop bit:1, parity bit: none.

2.Command list and meaning.

3.Command list and meaning.

0x86- Read CO2 concentration (for 0-50000ppm range)

CO2 concentration = HIGH *256+ LOW Eg. 01 in hexadecimal is equals to 1 in decimal, F4 in hexadecimal is equals to 244 in decimal. CO2 concentration=01*256+244=500ppm

0x9C- Read CO2 concentration (for 0-150000ppm range)

CO2 concentration= Data 1 << 24 + Data 2 << 16 + Data 3 << 8 + Data 4

Checksum calculation method

Calculating Checksum:

1、Add Byte 1 to Byte 7: 0x01 + 0x86 + 0x00 + 0x00 + 0x00 + 0x00 + 0x00 = 0x87

2、Negative: 0xFF – 0x87 = 0x78

3、Then+1:0x78 + 0x01 = 0x79

C language

char getCheckSum(char *packet)
{
char i, checksum;
for( i = 1; i < 8; i++)
{
checksum += packet[i];
}
checksum = 0xff – checksum;

DWM-HEXADUO AIR PURIFIER USER GUIDE

DWM-HexaDuo Air Purifier is easy to use, and helps to produce a clean and safe enviroment. It’s an energy-efficient high performance air purifier The Size is compact enough to place in anywhere.

1.Packing list

dwm-hexaduo-air-purifier-washable-electrostatic-filter-kills-airborne-bacteria-package-list

dwm-hexaduo-air-purifier-washable-electrostatic-filter-kills-airborne-bacteria-package-list

2.Components

dwm-hexaduo-air-purifier-washable-electrostatic-filter-kills-airborne-bacteria-components

dwm-hexaduo-air-purifier-washable-electrostatic-filter-kills-airborne-bacteria-components

3.Operations

DWM-HEXAONE-AIR-PURIFIER-USER-GUIDE-operation

DWM-HEXAONE-AIR-PURIFIER-USER-GUIDE-operation

3.1 Operation Modes

3.1.1 Clean Mode

When the accumulated operation time reach two weeks,The cleaning

indicatorcleaning-indicatorwill be lights up to remind the user to clean the collection array.

Press thefan-speed-press fan speed level button for 3sec to acknowledge the cleaning alert. The cleaning inducator buttton will be turn off.Power off the unit and take out collection array to clean.Clean and dry the collection array before re-install back to the device.

3.1.2 Protection Mode

When the device is operating, and the collection array is removed suddenly, then the device will be stop working, and all indicators will flash at the same time as an alert to user.when the device is powered on without the collection array the device will not work, and all Indicators will flash at the same time as an alert to user. the user needs to shut down the device, and put the collection array into the device, and then the unit will return to nomal operation mode.

3.1.3 Failure Mode

When the collection array accumulates dust anvil or debris and over the collection limit, the device will be stop operation, and all of te lights will flash at the same time as alert to user.The user will need to shut down the device and clean the collection array.

4.Instructions

4.1 connect the power adptor

dwm-hexaduo-air-purifier-washable-electrostatic-filter-kills-airborne-bacteria-connect-power

dwm-hexaduo-air-purifier-washable-electrostatic-filter-kills-airborne-bacteria-connect-power

Note:

In order to have better effect of air purification, the circular clearance area should be 1.6ft(0.5m) in radius when the device is placed at the center.

dwm-hexaduo-air-purifier-washable-electrostatic-filter-kills-airborne-bacteria-room

dwm-hexaduo-air-purifier-washable-electrostatic-filter-kills-airborne-bacteria-room

4.2 Turn On the device

DWM-HEXAONE-AIR-PURIFIER-USER-GUIDE-power-on

DWM-HEXAONE-AIR-PURIFIER-USER-GUIDE-power-on

Note:

You may hear static noise when the unit is first time started, This is nomal due to setting up of the electrostatic field for capturing the air borne particles.

4.3 Adjust the required speed

DWM-HEXAONE-AIR-PURIFIER-USER-GUIDE change-fan-speed

DWM-HEXAONE-AIR-PURIFIER-USER-GUIDE change-fan-speed

Note:

“Turbo Fan Mode” is a 20-min turbo cleaning setting that rapidly purify the air with its maximum power in shortest possiable time, the fan speed will then resume to low level for power saving and silent operations.

4.4 Stretch the bipod of the unit and put the unit on a flat table or floor.

dwm-hexaduo-air-purifier-washable-electrostatic-filter-kills-airborne-bacteria-set

dwm-hexaduo-air-purifier-washable-electrostatic-filter-kills-airborne-bacteria-set

4.Clean and Maintenance

4.1 Power off the unit and turn the collection array upright to unlock and then remove it from the unit.

dwm-hexaduo-air-purifier-washable-electrostatic-filter-kills-airborne-bacteria-open-clean

dwm-hexaduo-air-purifier-washable-electrostatic-filter-kills-airborne-bacteria-open-clean

4.2 For strong or sticky oil type pollutant,spray soft cleaner and use cleaning tool to clean the individual dust plate.

dwm-hexaduo-air-purifier-washable-electrostatic-filter-kills-airborne-bacteria-maintenance-clean

dwm-hexaduo-air-purifier-washable-electrostatic-filter-kills-airborne-bacteria-maintenance-clean

4.3 Immerse the whole collection array into water or rines the collection array throroughly under running water.

dwm-hexaduo-air-purifier-washable-electrostatic-filter-kills-airborne-bacteria-open-clean-1

dwm-hexaduo-air-purifier-washable-electrostatic-filter-kills-airborne-bacteria-open-clean-1

4.4 Dry the collection array before re-install it back to the unite,install the collection array in vertical direction and then turn to desire air flow angle and lock it.

dwm-hexaduo-air-purifier-washable-electrostatic-filter-kills-airborne-bacteria-maintenance-clean-1

dwm-hexaduo-air-purifier-washable-electrostatic-filter-kills-airborne-bacteria-maintenance-clean-1

dwm-hexaduo-air-purifier-washable-electrostatic-filter-kills-airborne-bacteria-note

dwm-hexaduo-air-purifier-washable-electrostatic-filter-kills-airborne-bacteria-note

5 Trouble shooting

Not Operating ,No light indication

-Ensure the collection array is connected with the fan body firmly.

-Ensure the AC adaptor is fully inserted into the AC outlet and its plug is connected to the DC jack of the air purifier.

-Press the Power button momentarily to observe that it’s light up.

Not operating,indicator flashing

-Check the collection array, for too heavy dirt or any clogging by hairs or fibers.

-Clean the collection array as needed and install back ion the air purifier.

If you want buy one pls visit our online shop DWM-HexaDuo Air Purifier .

DWM-HEXAONE AIR PURIFIER USER GUIDE

DWM-HEXAONE AIR PURIFIER is easy to use, and helps to produce a clean and safe enviroment. It’s an energy-efficient high performance air purifier The Size is compact enough to place in anywhere.

1.Packing list

DWM-HEXAONE-AIR-PURIFIER-USER-GUIDE-package

DWM-HEXAONE-AIR-PURIFIER-USER-GUIDE-package

2.Components

WM-HEXAONE-AIR-PURIFIER-USER-GUIDE-Componets

3.Operations

DWM-HEXAONE-AIR-PURIFIER-USER-GUIDE-operation

DWM-HEXAONE-AIR-PURIFIER-USER-GUIDE-operation

3.1 Operation Modes

3.1.1 Clean Mode

When the accumulated operation time reach two weeks,The cleaning

indicatorcleaning-indicatorwill be lights up to remind the user to clean the collection array.

Press thefan-speed-press fan speed level button for 3sec to acknowledge the cleaning alert. The cleaning inducator buttton will be turn off.Power off the unit and take out collection array to clean.Clean and dry the collection array before re-install back to the device.

3.1.2 Protection Mode

When the device is operating, and the collection array is removed suddenly, then the device will be stop working, and all indicators will flash at the same time as an alert to user.when the device is powered on without the collection array the device will not work, and all Indicators will flash at the same time as an alert to user. the user needs to shut down the device, and put the collection array into the device, and then the unit will return to nomal operation mode.

3.1.3 Failure Mode

When the collection array accumulates dust anvil or debris and over the collection limit, the device will be stop operation, and all of te lights will flash at the same time as alert to user.The user will need to shut down the device and clean the collection array.

4.Instructions

4.1 connect the power adptor


DWM-HEXAONE-AIR-PURIFIER-USER-GUIDE-connect-adapter

DWM-HEXAONE-AIR-PURIFIER-USER-GUIDE-connect-adapter

Note:

In order to have better effect of air purification, the circular clearance area should be 1.6ft(0.5m) in radius when the device is placed at the center.

DWM-HEXAONE-circular-clearance-area

DWM-HEXAONE-circular-clearance-area

4.2 Turn On the device

DWM-HEXAONE-AIR-PURIFIER-USER-GUIDE-power-on

DWM-HEXAONE-AIR-PURIFIER-USER-GUIDE-power-on

Note:

You may hear static noise when the unit is first time started, This is nomal due to setting up of the electrostatic field for capturing the air borne particles.

4.3 Adjust the required speed

DWM-HEXAONE-AIR-PURIFIER-USER-GUIDE change-fan-speed

DWM-HEXAONE-AIR-PURIFIER-USER-GUIDE change-fan-speed

Note:

“Turbo Fan Mode” is a 20-min turbo cleaning setting that rapidly purify the air with its maximum power in shortest possiable time, the fan speed will then resume to low level for power saving and silent operations.

4.4 Adjust the Air flow direction.

DWM-HEXAONE-AIR-PURIFIER-USER-GUIDE-adjust-direction

DWM-HEXAONE-AIR-PURIFIER-USER-GUIDE-adjust-direction

5.Clean and Maintenance

5.1 Power off the unit and turn the collection array upright to unlock and then remove it from the unit.

DWM-HEXAONE-AIR-PURIFIER-USER-GUIDE-clean-maintenance

DWM-HEXAONE-AIR-PURIFIER-USER-GUIDE-clean-maintenance

5.2 For strong or sticky oil type pollutant,spray soft cleaner and use cleaning tool to clean the individual dust plate.

DWM-HEXAONE-AIR-PURIFIER-USER-GUIDE-clean

DWM-HEXAONE-AIR-PURIFIER-USER-GUIDE-clean

5.3 Immerse the whole collection array into water or rines the collection array throroughly under running water.

DWM-HEXAONE-AIR-PURIFIER-USER-GUIDE-clean-1

DWM-HEXAONE-AIR-PURIFIER-USER-GUIDE-clean-1

5.4 Dry the collection array before re-install it back to the unite,install the collection array in vertical direction and then turn to desire air flow angle and lock it.

DWM-HEXAONE-AIR-PURIFIER-USER-GUIDE-maintenance

DWM-HEXAONE-AIR-PURIFIER-USER-GUIDE-maintenance

DWM-HEXAONE-AIR-PURIFIER-USER-GUIDE-note

DWM-HEXAONE-AIR-PURIFIER-USER-GUIDE-note

6 Trouble shooting

Not Operating ,No light indication

-Ensure the collection array is connected with the fan body firmly.

-Ensure the AC adaptor is fully inserted into the AC outlet and its plug is connected to the DC jack of the air purifier.

-Press the Power button momentarily to observe that it’s light up.

Not operating,indicator flashing

-Check the collection array, for too heavy dirt or any clogging by hairs or fibers.

-Clean the collection array as needed and install back ion the air purifier.

If you want buy one pls visit our online shop DWM-HEXAONE AIR PURIFIER .